How to Extract a Color Palette from an Image
A single photo can contain tens of thousands of distinct colors. Most of the time you do not want all of them — you want a controlled set: the eight that define a brand, the sixteen a pixel-art sprite is allowed to use, the limited palette a screen printer can actually ink. Reducing an image to an exact number of colors, inspecting the result, and exporting it in a format your tools understand is a routine job that desktop editors handle awkwardly. This guide shows how to do it precisely in your browser with PaletteForge — no AI, no uploads.
Why Reduce Colors and Extract Palettes
Color reduction is the foundation of several everyday workflows. A design system starts from a small, deliberate palette, and pulling those colors directly from a reference image or mood board keeps the brand consistent. Indexed PNG and GIF formats store only the colors they actually use, so cutting an image to 32 or 64 colors can shrink file size dramatically without an obvious quality loss. Pixel art and game sprites are usually constrained to a fixed palette on purpose, and screen printing or risograph charges per ink, so the color count is a hard budget.
The alternative — picking colors by hand with an eyedropper and copying hex codes one by one — is slow and inconsistent. An algorithm that chooses genuinely representative colors and lets you export the whole set at once removes that busywork and makes the result repeatable across a series of assets.
How Median-Cut Quantization Works
PaletteForge reduces colors with median-cut quantization. Instead of picking colors at random or snapping to a fixed grid, the algorithm treats every pixel as a point in color space, then repeatedly splits that space in two along its longest axis. Each split is made at the median, so the densest regions of color get subdivided the most. The final palette is built from the average of each region, weighted by how much of the image actually uses those tones — so a small but vivid accent is not lost, and a large flat background is not over-represented.
Two properties make this practical. First, the matching uses a perceptual weighted-RGB distance, so similar colors map to the right swatch rather than the nearest raw number. Second, the process is fully deterministic: the same image at the same color count always produces the same palette. There is no AI and no randomness, which means the look is repeatable — useful when you are building a whole set of icons, frames, or sprites that must share one palette.
Step-by-Step: From Image to Palette
- Load an image — drop a file onto the page, click to choose one, or paste from the clipboard. Nothing is uploaded; the image is processed locally.
- Set the color count — pick 8, 16, or 32 with one click, or type any value from 2 to 256. Lower counts give a bold, poster-like result; higher counts preserve gradients and skin tones.
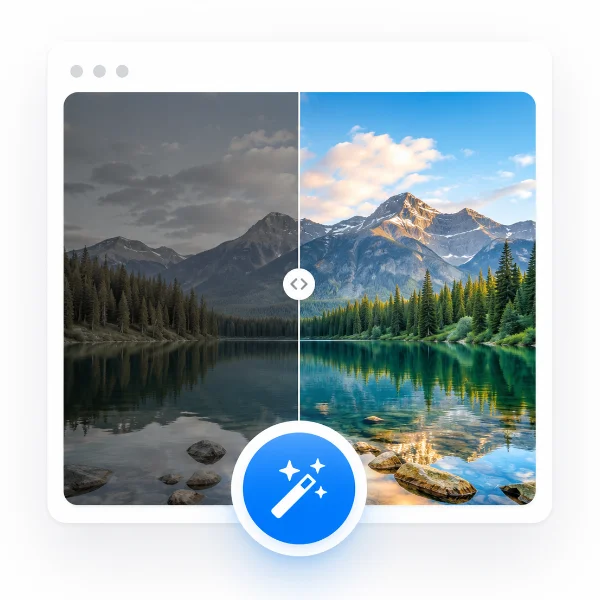
- Choose a dithering mode — None, Floyd–Steinberg, or Ordered (Bayer). Use the before/after slider to compare the reduced result against the original instantly.
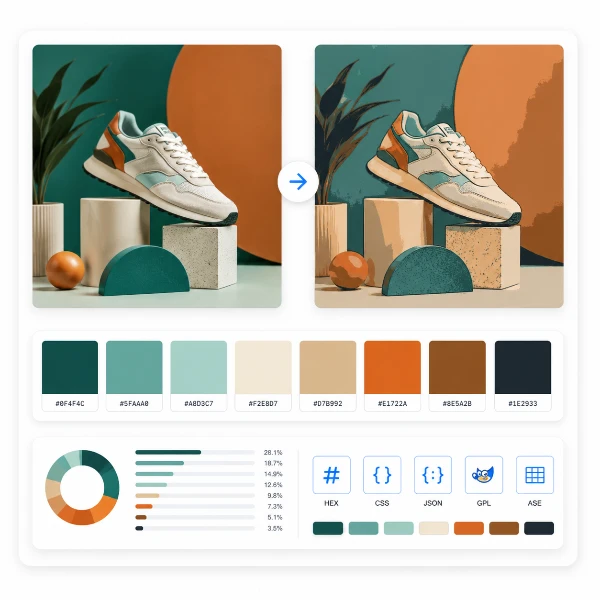
- Inspect the palette — every chosen color appears as a swatch with its HEX value. Click any swatch to copy its code.
- Export — download the palette as HEX, CSS, JSON, GIMP .gpl, or Adobe .ase, or save the reduced image as a PNG with your color count and dithering baked in.
Dithering: None, Floyd–Steinberg, or Ordered
Cutting colors down can leave visible banding across smooth gradients — a sky or a soft shadow turns into hard stripes. Dithering hides this by interleaving the available palette colors in a fine pattern that your eye blends back into the in-between tones. PaletteForge offers three modes so you can match the technique to the image.
Use None for flat illustrations, logos, and UI where you want clean solid fills. Floyd–Steinberg error diffusion scatters the rounding error into neighboring pixels and usually gives the smoothest result for photographs and detailed artwork. Ordered dithering with a Bayer 4×4 matrix produces a crisp, regular halftone texture — the classic choice for pixel art and a deliberately retro, mechanical grain. Because the slider updates instantly, you can weigh smoothness against file size on your own image instead of guessing.
Export Formats and Where They Go
A palette is only useful where you actually work, so PaletteForge exports to the formats each audience expects. For code, copy a plain HEX list, CSS custom properties you can paste straight into a stylesheet, or JSON to feed a build script or design-token pipeline. For open-source painting, the GIMP .gpl format loads as a named palette in GIMP, Krita, and Inkscape.
For Adobe and pixel-art workflows, the .ase (Adobe Swatch Exchange) file loads directly into Photoshop, Illustrator, and Aseprite, bringing your colors in as a ready-made swatch group. You can also download the reduced image itself as a PNG with the chosen color count and dithering already applied — handy for indexed assets or a quick preview. That turns PaletteForge into a single step between a reference image and a production-ready palette.
Your Image Never Leaves Your Device
PaletteForge runs entirely in your browser using the Canvas API. The image is decoded into memory, quantized, and rendered locally — no file is ever transmitted to a server. That makes it safe for confidential mockups, unreleased game art, and client work under NDA, where uploading to a third-party service is not an option.
There is no account, no login, and no usage limit. Everything runs from the page you already loaded, and when you close or reload the tab, every trace is gone. The tool is stateless by design — there is no server to send your data to.
Build Your Palette Now
Reducing an image to an exact set of colors gives you a brand palette, a pixel-art-ready swatch group, or a smaller indexed file in seconds — without manual eyedropper work or copying hex codes by hand. PaletteForge handles the whole workflow in your browser: load the image, set the count, pick a dithering mode, and export. No account, no upload, no waiting.
Try PaletteForge now →